Showing posts with label All Gus'ed Up. Show all posts
All Gus'ed Up: DIY Nail Polish Cabinet

All Gus'ed Up: DIY Nail Polish Cabinet


I'm sure by now you've seen those DIY nail polish cabinets/shelves that are all over Pinterest and every other site remotely connected with beauty. Some are made of foamboard and others are made of wood. Lulu decided that she needed one, so Gus and I worked together to give the girl what she wanted!

{enjoy the view} DIY Nail Polish Organizer (with easy change fabric backing) #DIY #cabinet #forthehome #howto

I looked at several different "plans", discussed the size and other particulars with Lulu, and then came up with my own version. Gus was the grunt labor - cutting all of the wood and doing all of the painting. One thing I wanted to add was a removable back piece that could be covered with fabric. That way Lulu would have the option of changing it up a bit.

Gus didn't have any fancy tools when we made this (although he got a cool Ryobi table saw for Father's Day, so future projects will be easier!), and we wanted to spend a minimum amount of time sanding/finishing, so we spent a little more to get higher grade wood. Of course, that translated into a higher cost. My point is, you could probably make this for less than we did if you don't mind sanding.


What we used:
3 - 8' pieces of select pine (smooth) boards
2 - 8' pieces of molding (just a little wider than the thickness of the boards)
1 - 2' X 4" piece of finished 1/4" plywood
1 - 30" X 40" piece of foam board
1 yd. 45" wide fabric
Repositionable spray adhesive
Various wood screws and finishing nails
Paint (we bought a sample of Behr at Home Depot)
Tools: drill, drill bits, hammer, saw, sandpaper, wood glue


Once all of the boards were cut and the ends sanded, Gus painted them. Then came the fun part of evenly spacing them! We lined up the 21" boards against one of the 25" boards, adjusted them until they were spaced evenly...


then marked the placement.


Gus drilled pilot holes for all of the nails...


and then nailed the shelves in place.


Next, we measured, cut, and sanded the edges of the trim for the front of the shelves. Not only is it decorative, but it's a little taller than the shelves, so it makes a "lip" that will help keep the bottles on the shelves. We attached the trim with wood glue and three tiny finishing nails.


Next, Gus did the finishing work - countersinking all of the nails, filling the holes, then sanding once dry.


Since I wanted Lulu to be able to easily change the background fabric, we had to design a way to slide the fabric board in and out, while keeping it fairly snug between the back and the shelves. I found some square dowels at Hobby Lobby that were just a bit thicker than a sheet of foam board - perfect! We used wood glue and finishing nails to attach a dowel to each side and the bottom of the cabinet, keeping them flush with the outer edges of the cabinet - then we painted them.


For the back of the cabinet, we used a piece of birch plywood. We put the cabinet on the plywood, traced the shape, then cut it out. Once we made sure it was the right size, we sanded the edges and painted it.


For the removable fabric insert, I used a piece of white foam board. To get the correct size, I measured the open area on the back of the cabinet - the area between the dowels. The foam board had to be slightly smaller than this so that it could be removed, so I cut inside the measured lines.

I cut a piece of fabric to fit, adding 4 inches to each side so that it could be folded over the edges. I sprayed the foam board with repositionable adhesive, and applied the fabric, folding the edges to the back and applying more spray adhesive to hold them in place. Then all I had to do was slide the fabric board into the "pocket"!


I can't believe I can't find the picture of Gus showing how to remove the fabric board! So sorry!! But here is the cabinet with the fabric board in place.


Love, love, love this fabric! Found it at Hobby Lobby!


Lulu loves her cabinet - and she liked the fabric so much that I went back to buy more so that I can make matching pillows!


Ready to make one now?

~  ~  ~  ~  ~

Are you blog-stalking me yet? If not, you should be! You can find me on Facebook, Twitter, Instagram, Google+, Bloglovin', Pinterest, LinkedIn, & Polyvore!

I link up at these parties: party, Party, PARTY!
Read more...
Kim
0 Comments
The Distressed Chalk Paint Nightstand Makeover (that almost didn't happen)

The Distressed Chalk Paint Nightstand Makeover (that almost didn't happen)


Chalk paint, chalk paint, chalk paint. It seems that not a day goes by that I don't hear or read about someone doing a project with it. And yes, I felt a little left out since I hadn't tried it yet. I wanted to buy Annie Sloan paint, but alas, there are no local stores that sell it, and I'm too cheap to pay $10 to ship a little pint jar. So, I researched making my own, until I found a "recipe" that looked like it worked - then I did a little nightstand makeover...

Distressed Chalk Paint Nightstand Makeover | enjoytheviewblog.com #chalkpaint #makeover #furniture #DIY

The recipe I used came from How To Distress Furniture. I chose this site because I liked how they compared different ways of making chalk paint - and it looked like they knew what they were doing with it. I opted for the Plaster of Paris version:

1 cup latex paint
2.5 TBSP Plaster of Paris
1.5 TBSP. cool water

Distressed Chalk Paint Nightstand Makeover | enjoytheviewblog.com #chalkpaint #makeover #furniture #DIY

For the paint, I purchased an 8 oz. sample of Behr flat interior paint from Home Depot for $2.94. The color is Behr S470-6 "Shipwreck", and it's very similar to Annie Sloan's Aubusson. I mixed everything in a quart Mason jar, and just used the paint right out of that.

I wasn't sure what to expect. Would that paint be lumpy? Would it be thick and difficult to apply? Would it dry quickly or take forever? Well, there was no reason to worry. The paint was smooth, with a consistency that really wasn't much different than before I added the plaster and water. 

The nightstand I used was given to Lulu by my mom. I think she picked it up at a yard sale. I'm not sure if she spraypainted it white or if she bought it that way, but whoever did it, didn't do it well - plus there were dents, nicks, and flaking paint. 

Distressed Chalk Paint Nightstand Makeover | enjoytheviewblog.com #chalkpaint #makeover #furniture #DIY

I decided not to prep the nightstand in any way other than to wipe it down to make sure it was clean, since that's what you're supposed to do with chalk paint. I felt my DIY chalk paint was easier to apply than regular Behr paint (which is my favorite paint) - and it dried very quickly. Within an hour, I was able to apply a second coat (I probably could've done it sooner, but I wanted to play it safe). Honestly, if I had been a little more generous with the first coat, I don't think a second coat would have been needed at all.

As you can see, the paint dries to a matte, almost chalky finish.

Distressed Chalk Paint Nightstand Makeover | enjoytheviewblog.com #chalkpaint #makeover #furniture #DIY

I had some paste wax left over from when I used a Venetian plaster technique on the first floor half bath, so I used that to wax the nightstand. Then I used sandpaper to rough-up the edges a little. This was my first attempt at "distressing" anything, so I admit that I was pretty timid with the sandpaper.

Distressed Chalk Paint Nightstand Makeover | enjoytheviewblog.com #chalkpaint #makeover #furniture #DIY

And this is the part "that almost didn't happen". I hated it. I was so disappointed. I thought it was going to be this pretty project that I would love and want to do over and over again. Not so much. So I left it in the garage for several weeks.

Then, a few days ago, Gus asked me what I wanted to do with the nightstand. I was still pretty disgusted with it, so I told him he could just sand it and repaint it. Since it's so cold in the garage, he did the sanding in the garage, and then brought it up to the guest bathroom on the second floor so he could paint it where it was warm.

But before he could paint it, I took one look at it and fell in love! Apparently, Gus has the knack for just the right amount of sanding to make it look good. He had no clue what he was doing - was just sanding it to prep it for paint - and it looked awesome!! I wiped it down, put a little more wax on it, and now it's on display in the guest bedroom.

Distressed Chalk Paint Nightstand | enjoytheviewblog.com #chalkpaint #makeover #furniture #DIY
Distressed Chalk Paint Makeover | enjoytheviewblog.com #chalkpaint #makeover #furniture #DIY
Distressed Chalk Paint Nightstand Makeover | enjoytheviewblog.com #chalkpaint #makeover #furniture #DIY
Distressed Chalk Paint | enjoytheviewblog.com #chalkpaint #makeover #furniture #DIY
DIY Distressed Chalk Paint Nightstand Makeover | enjoytheviewblog.com #chalkpaint #makeover #furniture #DIY

Pretty awesome, huh?

DIY Distressed Chalk Paint | enjoytheviewblog.com #chalkpaint #makeover #furniture #DIY

We also removed the drawer hardware and spraypainted it metallic pewter.

DIY Distressed Chalk Paint Nightstand Makeover | enjoytheviewblog.com #chalkpaint #makeover #furniture #DIY

Gus is now in charge of all sanding. Except for patching walls. He sucks at that. :-)

What do you think? Have you tried chalk paint yet? Did you make your own? How did it turn out?

~  ~  ~  ~  ~

Are you blog-stalking me yet? If not, you should be! You can find me on Facebook, Twitter, Instagram, Google+, Bloglovin', Pinterest, LinkedIn, & Polyvore!

I link up at these parties: party, Party, PARTY!
Read more...
Kim
0 Comments
All Gus'ed Up: Easy DIY Gate

All Gus'ed Up: Easy DIY Gate


My handsome and ever-so-handy husband, Gus, is guest posting today! He's going to be telling you about a little "side" project he did while working on our deck makeover. Enjoy!

easy DIY gate enjoytheviewblog.com

Hey, everyone - Gus here!

We have a pretty good-sized elevated deck that overlooks our fenced-in backyard. When weather is nice, we like to sit outside and eat dinner or just relax. Our dog, Riley, (who is a miniature Australian Shepherd) also loves being out on the deck.  However, he is mean very territorial and will run down off the deck to furiously chase and bark at anything that comes close to our fence line (other dogs, kids, birds, lawnmowers, etc.)  As you can imagine, it is a bit difficult to relax when Riley is acting a fool barking his head off.

Solution! – a quick do-it-yourself deck gate!

I made the gate entirely from some leftover 2x2 balusters from my deck restoration project (upcoming on the blog as soon as I finish staining it).

DIY gate enjoytheviewblog.com

I measured the opening at the top of the deck steps and fashioned the frame to fit in there - two balusters horizontal and two vertical, attached to each other using wood screws. For spacing and reinforcement reasons, I then added an extra vertical one at one end. Next, I evenly spaced the balusters inside the frame (I used 5). Our local building code requires that you have no more than 4 inches space between balusters, so be sure to check your local code. Again, everything was fastened together with wood screws.

Then I stained the gate to match the new stain on the deck.

how to make a gate enjoytheviewblog.com

Next, I attached a small handle (to open the gate) on one side, and a couple of spring hinges (after repainting them oil-rubbed bronze as instructed by my lovely wife) on the other side (which was also attached to the deck), so the gate will close by itself after it is opened. I used a level on top of the gate to make sure it was straight.

how to make a deck gate enjoytheviewblog.com
diy deck gate enjoytheviewblog.com
make your own gate enjoytheviewblog.com

Now, when other dogs (or people) are out near the fence, Riley can be on the deck with us and we don’t have to worry about him running into the yard and barking. Problem solved!

make a gate enjoytheviewblog.com

It's me now! Didn't he do a great job? Would you believe that he is completely self-taught? My grandfather taught him a few little things many years ago, but the majority of what Gus knows he has learned by trial and error.

make a safety gate enjoytheviewblog.com

Check out these before and after pictures - ignore the part of the deck that isn't stained yet, we're still working on it!! I promise to get the entire deck makeover on the blog before fall!

make your own gate enjoytheviewblog.com
easy diy gate for your deck enjoytheviewblog.com
easy gate for your deck enjoytheviewblog.com

Gus swears the gate was really simple to make - and if he can do it, so can you!

We've lived here 6 years, and I've talked about getting a deck gate for 5.5 of those years. What little projects do you need to do that you keep putting off? 

~  ~  ~  ~  ~
 
Are you blog-stalking me yet! If not, you should be! You can find me on Facebook, Twitter, Instagram, Google+, Bloglovin', Pinterest, & Polyvore!

I link up at these parties: party, Party, PARTY!
Read more...
Kim
0 Comments
All Gus'ed Up: How To Paint Wrought Iron

All Gus'ed Up: How To Paint Wrought Iron


Do you have some wrought iron furniture that has seen better days? Gus is back to show you how to make it look good-as-new!

three photos showing different steps in painting wrought iron furniture

(This post may contain affiliate links which were added to make it easier for you to find the items. If you click on an affiliate link and make a purchase, I will receive a small commission (at no extra cost to you). You are free to use the links or not - if you do, I thank you!)

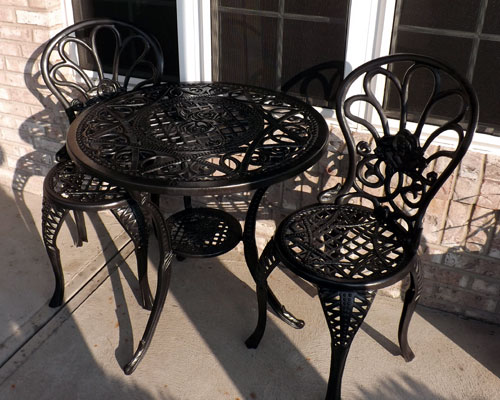
We have a wrought iron bistro set that sits on our front porch. It's about 7 years old, and even though it's pretty sheltered from the weather, it needed a little facelift.

weathered wrought iron bistro set

Three easy steps is all it takes! First, he used a wire brush to remove any rust and loose paint. Then he washed it down and let it dry. Once it was dry, he painted it with Rustoleum Hammered Finish spray paint in black . That's it. So simple, so easy - and yet it makes a such big difference!

man spray painting a wrought iron chari

Check out the before & afters!

Wrought iron furniture before and after painting

wrought iron table legs before and after painting

Wrought iron furniture before and after spray painting

It looks just like it did when we bought it - all for around $7!

wrought iron table and chairs after painting

closeup of black wrought iron chair seat

painted wrought iron table and chair

See that cushion? I recovered it myself and you can read my tutorial here!

I'd love to see your makeovers! Share them in the comments!


Read more...
Kim
0 Comments
All Gus'ed Up: Easy Table Makeover

All Gus'ed Up: Easy Table Makeover


How many of you have a little table that has seen better days? Maybe it's in the attic or the garage or still in the house - because it's perfectly functional, just not as pretty as it was when it was new. Well, Gus has a solution for you! A makeover for your table that's easy-to-do and costs under $5!

{enjoy the view} | easy table makeover

I bought two of these tables about 8 years ago when we lived in our old house. Hey, I was going through a Margaritaville stage. Don't judge. <grin> We brought them with us when we moved: one went in the basement for Buddy's laptop, and the other went in the garage for Gus's crap important manly garage stuff.

I had been looking for a plant stand to put on the front porch, in the corner by the door - but the cheapest one I could find was $40! My cheap crafty side wouldn't allow me to pay that much for it when I knew we could create something for much less. Gus and I discussed how we were going to "cover" the top and eventually decided to go with wood.

What we used:

Gus worked on the legs of the table first - he scuffed them with a little sandpaper, rinsed them off, let them dry, then painted them with the black Rustoleum paint.

{enjoy the view} | easy table paint

Here's the obligatory shot of Gus a shot of Gus cutting the furring strips to size:

{enjoy the view} | cutting furring strips

Obviously, the amount of wood you need and the length of the strips will depend upon the size of your table. Our table was 13.75" square. Gus cut four pieces of wood and filed the ends with a wood file/rasp. Then he positioned the strips like this - and glued and nailed them into place:

{enjoy the view} | diagram for furring strips

Yes, I realize that the diagram is flipped from what the picture shows, but you get the idea!

{enjoy the view} | how to attach furring strips

The rest of the wood was cut into strips that covered the frame - so we measured the frame and the wood strips to determine how many we would need. It turned out that we needed 10 strips (15.5" long), and there would be a little space between each one. Again, after they were cut, Gus used the rasp on the cut ends to smooth them out a bit.

{enjoy the view} | another furring strip diagram

He put the end pieces on first, and then worked his way inward.

{enjoy the view} | making the table top

Each piece was glued and nailed into place - don't forget to position the pieces first so that you can make any adjustments before they're attached. We didn't sand the surface because we wanted a rougher, weathered look, but you can certainly sand it if you want it to be smooth.

{enjoy the view} | making a plant stand

Doesn't it look great? And it was QUICK, EASY, AND INEXPENSIVE. Love those words!

Now it's time for the finish. We decided to do "weathered' wood, just like for the weathered wood frames we did in the kitchen. As a matter of fact, I used the same stain and paint.

{enjoy the view} | minwax & Behr paint
{enjoy the view} | custom Behr paint

First, I sprayed the wood with a little water, because I didn't want the stain to penetrate too deeply. Then I brushed a light coat of the stain onto the wood and wiped it off immediately. I wasn't careful - some spots were dark, some were light - but I wanted it to be like that. Obviously, if you are just staining it, you'll want to be more careful with the application. You could just use paint, but I would make sure it was some type of exterior paint if the table will be outside.

Immediately after staining, I applied some of the watered-down grey paint. Again, I brushed it on, but I let it sit a little longer than the stain - then gently wiped it off, leaving a little paint behind.

{enjoy the view} | how to make weathered wood

Perfect! How cool does that look? I love it!!! If you want to see how we stacked the flower pots, you can see the tutorial here.
{enjoy the view} | table before & after
{enjoy the view} | weathered wood plant stand
{enjoy the view} | weathered wood table top

Are you ready to give it a try? Or have you already done a table makeover? Tell me about it!

~  ~  ~  ~  ~

Are you blog-stalking me yet! If not, you should be! You can find me on Facebook, Twitter, Instagram, Google+, Bloglovin', Pinterest, & Polyvore!

I link up at these parties: party, Party, PARTY!

 (Disclosure: There are affiliate links in the "what we used" section. Any purchases made via those links help me to keep {enjoy the view} up and running - and they also help fund my crafty projects!)
Read more...
Kim
0 Comments