Showing posts with label for the home. Show all posts
My Prime Day 2019 Picks from Amazon!

My Prime Day 2019 Picks from Amazon!


Don't you love the deals at Amazon? And Prime Day makes them even better! Here's what I picked up, what I love, and what I really, really want!

(I am an Amazon Affiliate. This post contains affiliate links which were added to make it easier for you to find the items. If you click on an affiliate link and make a purchase, I will receive a small commission (at no extra cost to you). You are free to use the links or not - if you do, I thank you!)

First up, what I've purchased so far:


Instant Pot Duo - I've been wanting an Instant Pot for almost a year, so when I saw the one we wanted for just less than half the original price, we had to get it. It arrived on Sunday, and we used it Sunday night for a pot roast and veggies. AMAZING!! And it didn't heat up my kitchen, which is awesome because it was 90 degrees out! If you prefer the slightly fancier version, it's just a few dollars more.


I grabbed this Travel Makeup Train Case when it was a lightning deal, and I can't wait to get it! It's no longer on the deal list (although you can still save by clicking on the coupon), but this one is very, very similar. At this price, it's a steal!


Don't laugh. Yes, I bought the Poo-Pourri when it was a lightning deal. Ha! The one I bought is gone, but there are other options here.

What's on my list:


What a fantastic deal on the Echo Dot!! We have two Echos (one on the first floor and one in the basement), so this would be perfect to add to our bedroom.


The deal of the day is the Amazon Fire Stick. (Less than half price, people!) We have a smart TV in the living room, but the bedroom TVs are older, so this would be great for watching Netflix, Hulu, and Amazon Prime Video.


We've been talking about getting the Amazon Ring for the front door. We have a doorbell, but it would be nice to actually see who is there (so we don't have to hide out and peek through the blinds). Yes. I do that.


If you're like me, you probably have a lot of makeup. I love this makeup carousel. It would be perfect for my most-used makeup and would fit right on my makeup table!

Here are some other deals that I love!
Silicone mats and baking pans
Air fryers
Garnier SkinActive Micellar Cleansing Water (love this stuff!)
Southern Keto Cookbook ($5 off with PRIMEBOOK19)

Check out my Amazon shopping page!

Happy Shopping!!
Read more...
Kim
0 Comments
How to Transform a Table with Fusion Mineral Paint

How to Transform a Table with Fusion Mineral Paint


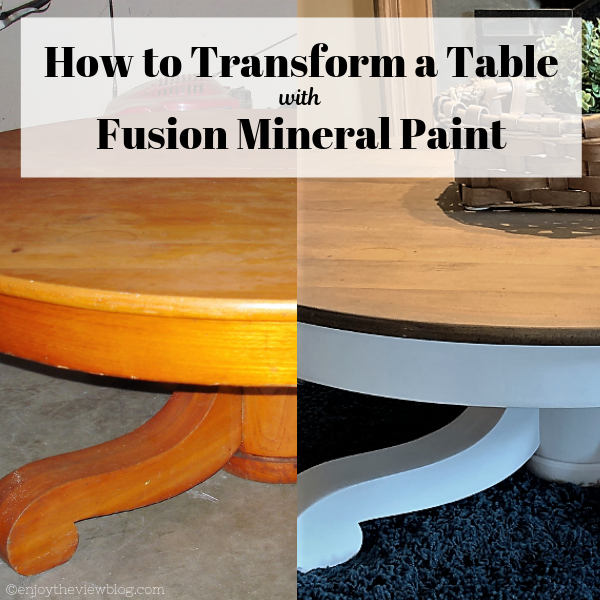
Furniture makeovers are all over social media! Have you hopped on the band wagon? If you follow me on Instagram and Snapchat, you've seen the photos I've recently shared of my front door and coffee table makeovers.

Sometimes, we're unhappy with furniture and all it really needs is a new outfit for us to love it again. Like this coffee table...

before and after photos of a round coffee table

This coffee table has such a history. It originally belonged to my great-great grandmother, and at that time was a large dining table with two removable leaves. She raised my grandfather, and he would tell stories about how she ironed clothing on the table. She used a cast iron "sad" iron, and would place a metal canning ring on the table so the iron wouldn't be directly on the wood. Of course, being metal, the ring became very hot, and burned a ring on the surface (you can see it in the left lower corner of the photo below).

After her death, the table went to my grandfather. He refinished it several times, but never took off the ring burn (thank goodness!) since it reminded him of his grandmother. By the time he passed the table to my mother, it had been cut down to make a coffee table and the leaves were long lost.

round wood coffee table
how the table looked when I got it from my mother

My mother gave me the table back in the early 1990's, and I kept it in storage for several years. Not because I didn't want to use it, but because of it's size. When we moved to Kentucky in 1997, our living room was large enough to accommodate the table. Gus stripped the table and applied an espresso-colored gel stain (the kind you leave on). It was better than it had been, but I still wasn't happy with it. And Gus wasn't happy with me since he had spent so much time on it.

base and legs of a coffee table stained in espresso
table with "leave-on" espresso stain

Fast forward to early 2019 - when I discovered Fusion Mineral Paint (FMP) and knew that's what I wanted to use on the table. Gus finally agreed to dividing the work - he would sand the table and I would paint and stain it.

I read everything I could find on Fusion Mineral Paint and joined the Paint It Beautiful Facebook group. Once I was sure I knew what needed to be done, we took a trip to our local Fusion retailer, Dresser Up Vintage Boutique in Newport. We purchased:

  • Fusion Mineral Paint in Casement
  • Fusion Mineral Paint (Homestead House) Stain and Finishing Oil in Cappuccino and Natural
  • Fusion™ TSP
  • Cling-On O Series brush (045)
  • Miss Mustard Seed's Milk Paint Hemp Oil Wood Finish

round coffee table with dark stain partially sanded off
removing the espresso stain

Gus took the legs off the table and cleaned all the pieces with Fusion TSP (which is actually an organic TSP alternative that doesn't have to be rinsed off). He used the electric sander (180 grit) to take the stain off, then sanded by hand with 220 grit. For the part of the table that was to be painted, he also sanded with 320 grit. (FYI: Don't sand anything to be stained with a grit higher than 220 or you will "close" the grain and stain won't penetrate or penetrate evenly.)

legs of a table painted with white primer
legs with BIN Zinsser primer

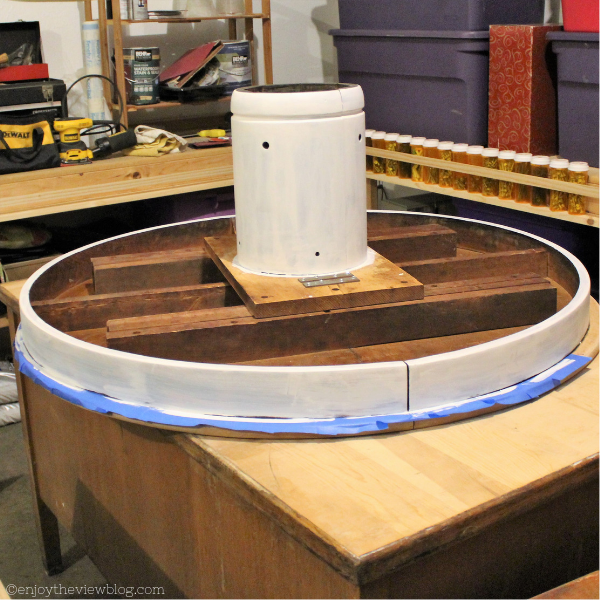
tabletop turned upside down with primer and painter's tape
pedestal and apron with primer

Once it was sanded, he cleaned off the dust and primed everything but the top (since it was going to be stained) with Zinsser oil-based BIN primer. We opted for the oil-based primer since we weren't certain of the type of wood (I was always told it was maple) and we didn't want to risk any tannin bleed-through after all the work Gus put into prepping it. I had also read that the Casement FMP paint didn't have a lot of pigment, creating the need for multiple coats for coverage, so the use of the white primer cut down on the number of coats I needed to apply.

The important things to remember with FMP are:

  • don't use too much paint
  • brush in one direction
  • don't go back over the paint once you've applied it
  • use an excellent-quality brush (like Cling-On or Staalmeister)

If you prep well and follow these guidelines, you will have very few (if any) brush strokes!

legs of table with two coats of white paint
legs with two coats of Fusion Mineral Paint in Casement

Even with priming, it took four coats to get the coverage I wanted - which I understand is common for Casement. I did not sand between coats because I wasn't aware of the process at the time, but I did wet sand with hemp oil and 800 grit sandpaper after the last coat of paint. It gave the table legs such a smooth finish!

I have to apologize for the photos that show the Cappuccino stain. None of them really show the true color. I tried photographing in different light, adjusting the color in Photoshop, and it still always looked too yellow or red. The true color is really more of a neutral brown.

tabletop with cappuccino stain
 applying Natural stain to table top (over the Cappuccino stain)

tabletop stained with cappuccino stain
after one coat Cappuccino stain and two coats Natural stain

For the table top, I used an inexpensive chip brush to apply the Cappuccino stain and soft, clean t-shirt rags to wipe it off. I applied to one half of the table at a time, and started wiping it off as soon as I finished the section. You can leave the stain on for up to 10 minutes, but I didn't want it to get too dark, so I wiped it off quickly. I was happy with the color, so I applied two more coats of stain, but I used the Natural shade so it didn't change the color.

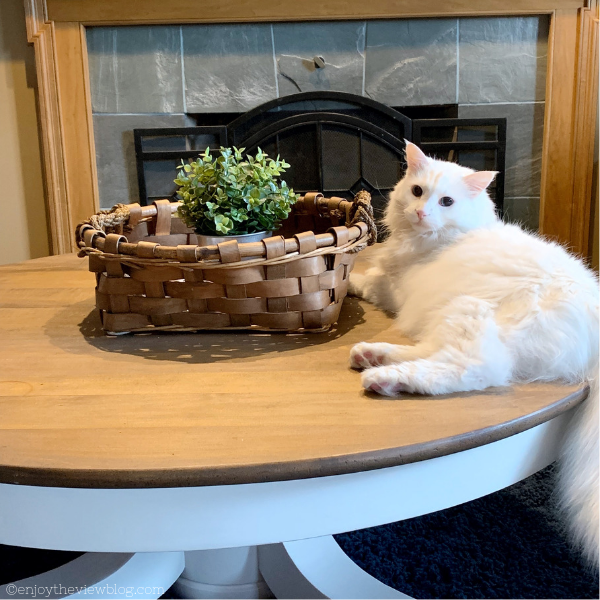
round coffee table with a white cat laying on it in front of a fireplace
Patrique really likes the "new" table

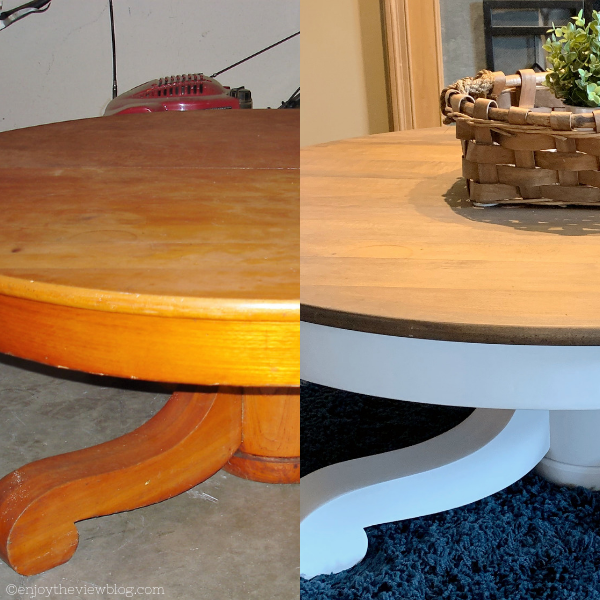
before and after of a round wood coffee table
my great-great-grandmother's table, before and after


round wood coffee table painted white on the bottom and cappuccino-stained top
We love the table now!

We were so pleased with the results that we decided to re-do the buffet portion of Gus' great-aunt's china cabinet in the same colors - and use it as a TV/entertainment cabinet! I'm still working on the drawers for that, but I'll do a post once it's finished!

What's your favorite furniture makeover? Have you used Fusion Mineral Paint?
Read more...
Kim
0 Comments
How to Make Your Grout Look Like New!

How to Make Your Grout Look Like New!


I love the look of a tile floor. What I don't love is dirty grout. What I really, really hate is grout that I've cleaned, and cleaned, and cleaned, but still looks dirty. But finally, after much searching, I found my holy grail grout product! You can make your grout look like new!

{enjoy the view}: How To Make Your Grout Look Like New! #grout #tile #howtocleangrout #groutrenewal #groutrefresh #groutrenew

I tried the "miracle" grout cleaning solution on Pinterest, and it worked - to a certain extent. It worked best on colored grout that wasn't too dirty. I bought a steam cleaner with cleaning attachments. Again, it helped, but the bathroom grout still looked slightly dirty. I wanted it to look white!

So back to the drawing board Pinterest I went. And I started reading about grout renewal/refinishing products. Different brands - how they worked - how easy (or difficult) they were to apply - how well they lasted - and most importantly, if they looked like "paint".

{enjoy the view}: How To Make Your Grout Look Like New! #grout #tile #howtocleangrout #groutrenewal #groutrefresh #groutrenew

I decided to try GroutRenew, which was available at my local Home Depot store (and also on Amazon). (The picture here has a brush-tip applicator top that I added.) It's a ready-to-use, non-flammable, water-based, polymer-modified colorant and sealant. I decided to use it in Lulu's old bathroom, which is now the guest bath since she has moved out. I toyed around with redoing the grout in a darker color, since it would be less likely to show dirt - but decided to go ahead and use "snow white" since that bathroom doesn't get a lot of use. According to the instructions for this product, you can completely change the color of your grout - but making a major change may require two coats of product.

The grout was soooo dirty, I'm embarrassed to show it to you. With all of the hair spray, hair color, and self-tanner used in there, the grout was a reddish-brown color. Yuck!! Okay, here it is - but don't judge, okay?

{enjoy the view}: How To Make Your Grout Look Like New! #grout #tile #howtocleangrout #groutrenewal #groutrefresh #groutrenew

Pretty nasty, right? Yes, this grout was originally white. But check it out after the GroutRenew!

{enjoy the view}: How To Make Your Grout Look Like New! #grout #tile #howtocleangrout #groutrenewal #groutrefresh #groutrenew

The transformation was amazing! And the grout doesn't look painted at all. It just looks bright, white, and CLEAN. I love it! So far, it's stayed clean, and I haven't had any issues with it flaking off or peeling. Check out the before and after again:

{enjoy the view}: How To Make Your Grout Look Like New! #grout #tile #howtocleangrout #groutrenewal #groutrefresh #groutrenew

Here's a close-up of the grout - you can see that it just looks like clean grout - not painted:

{enjoy the view}: How To Make Your Grout Look Like New! #grout #tile #howtocleangrout #groutrenewal #groutrefresh #groutrenew

Here's exactly how I did it:

I started by using my steam cleaner and the brush attachment to thoroughly clean the grout. This removed some of the stains and reassured me that I had removed all of the grout sealant. I let the grout dry overnight to be sure that I would get good adhesion.

I had a grout sealer applicator bottle with a brush attachment on the top that was specifically made for applying sealant to grout, and luckily, that top fit perfectly on the bottle of GroutRenew! I also armed myself with a couple of damp microfiber cloths and paper towels.

I applied the product generously, but not so generously that it "puddled". It's similar to painting - you want enough product to cover well, but not so much that it drips. The grout does absorb some of the product. The tiles in that bathroom are 12" X 12", so I worked with two grout lines at a time. I would apply the product, then stop and carefully wipe any excess off the tiles. I started in the back of the room and worked my way forward.

This particular bathroom is actually two rooms. The front room has vanity and sink (about 6' x 6'), then there is a door between that room and the back room, which has the shower and toilet (about 6' x 8'). I did each room on consecutive days, and each one took about 3-4 hours.

I'm going to be perfectly honest with you. This isn't the easiest project in the world, but it's certainly doable. You're on your hands and knees on a hard tile floor, working with tiny grout lines. The GroutRenew gets on the tile, and it's best to wipe it off while it's still wet. It's tedious work. But I managed to get a rhythm going - and if I can do it after having 3 back surgeries and chronic back pain, then you can do it, too. :-)

{enjoy the view}: How To Make Your Grout Look Like New! #grout #tile #howtocleangrout #groutrenewal #groutrefresh #groutrenew

Details about GroutRenew:
  • 8 oz. covers 50-300 sq. ft.
  • Protect from traffic for 2 hours.
  • Protect from water for 24 hours.
  • Avoid scrubbing or excessive cleaning of grout for 20 days to allow for full cure.

Notes:
  • I've seen reviews that say they painted it on, then waited to wipe off the tile. The actual product instructions say to lightly mist with water (after colorant has dried for 30-60 minutes), and let it stand for 5 minutes - then remove excess colorant from tiles using water and a white nylon scrubpad. But it also says to protect from water for 24 hours! Not sure how you're supposed to do both. I'm telling you right now - in the few instances where I didn't get it wiped off while it was still wet, I had to scrape it off with my fingernail. So I don't know how these people "wiped it off" after more than an hour.
  • Some reviews said they had issues with it peeling off. I really think these people didn't properly prep the surface. If there is any sealant left on your grout, this product isn't going to be able to adhere properly.
  • I think there are about 30 different colors from which to choose, but my local store didn't carry them all. 

So what do you think? Are you ready to give it a try?

(Disclaimer: There are some affiliate links in this post, however, this post is not sponsored. I purchased this product myself and all opinions are my own.)

 ~  ~  ~  ~  ~

Are you blog-stalking me yet? If not, you should be! You can find me on Facebook, Twitter, Instagram, Google+, Bloglovin', Pinterest, LinkedIn, & Polyvore!

I link up at these parties: party, Party, PARTY!
Read more...
Kim
0 Comments
All Gus'ed Up: DIY Nail Polish Cabinet

All Gus'ed Up: DIY Nail Polish Cabinet


I'm sure by now you've seen those DIY nail polish cabinets/shelves that are all over Pinterest and every other site remotely connected with beauty. Some are made of foamboard and others are made of wood. Lulu decided that she needed one, so Gus and I worked together to give the girl what she wanted!

{enjoy the view} DIY Nail Polish Organizer (with easy change fabric backing) #DIY #cabinet #forthehome #howto

I looked at several different "plans", discussed the size and other particulars with Lulu, and then came up with my own version. Gus was the grunt labor - cutting all of the wood and doing all of the painting. One thing I wanted to add was a removable back piece that could be covered with fabric. That way Lulu would have the option of changing it up a bit.

Gus didn't have any fancy tools when we made this (although he got a cool Ryobi table saw for Father's Day, so future projects will be easier!), and we wanted to spend a minimum amount of time sanding/finishing, so we spent a little more to get higher grade wood. Of course, that translated into a higher cost. My point is, you could probably make this for less than we did if you don't mind sanding.


What we used:
3 - 8' pieces of select pine (smooth) boards
2 - 8' pieces of molding (just a little wider than the thickness of the boards)
1 - 2' X 4" piece of finished 1/4" plywood
1 - 30" X 40" piece of foam board
1 yd. 45" wide fabric
Repositionable spray adhesive
Various wood screws and finishing nails
Paint (we bought a sample of Behr at Home Depot)
Tools: drill, drill bits, hammer, saw, sandpaper, wood glue


Once all of the boards were cut and the ends sanded, Gus painted them. Then came the fun part of evenly spacing them! We lined up the 21" boards against one of the 25" boards, adjusted them until they were spaced evenly...


then marked the placement.


Gus drilled pilot holes for all of the nails...


and then nailed the shelves in place.


Next, we measured, cut, and sanded the edges of the trim for the front of the shelves. Not only is it decorative, but it's a little taller than the shelves, so it makes a "lip" that will help keep the bottles on the shelves. We attached the trim with wood glue and three tiny finishing nails.


Next, Gus did the finishing work - countersinking all of the nails, filling the holes, then sanding once dry.


Since I wanted Lulu to be able to easily change the background fabric, we had to design a way to slide the fabric board in and out, while keeping it fairly snug between the back and the shelves. I found some square dowels at Hobby Lobby that were just a bit thicker than a sheet of foam board - perfect! We used wood glue and finishing nails to attach a dowel to each side and the bottom of the cabinet, keeping them flush with the outer edges of the cabinet - then we painted them.


For the back of the cabinet, we used a piece of birch plywood. We put the cabinet on the plywood, traced the shape, then cut it out. Once we made sure it was the right size, we sanded the edges and painted it.


For the removable fabric insert, I used a piece of white foam board. To get the correct size, I measured the open area on the back of the cabinet - the area between the dowels. The foam board had to be slightly smaller than this so that it could be removed, so I cut inside the measured lines.

I cut a piece of fabric to fit, adding 4 inches to each side so that it could be folded over the edges. I sprayed the foam board with repositionable adhesive, and applied the fabric, folding the edges to the back and applying more spray adhesive to hold them in place. Then all I had to do was slide the fabric board into the "pocket"!


I can't believe I can't find the picture of Gus showing how to remove the fabric board! So sorry!! But here is the cabinet with the fabric board in place.


Love, love, love this fabric! Found it at Hobby Lobby!


Lulu loves her cabinet - and she liked the fabric so much that I went back to buy more so that I can make matching pillows!


Ready to make one now?

~  ~  ~  ~  ~

Are you blog-stalking me yet? If not, you should be! You can find me on Facebook, Twitter, Instagram, Google+, Bloglovin', Pinterest, LinkedIn, & Polyvore!

I link up at these parties: party, Party, PARTY!
Read more...
Kim
0 Comments