Showing posts with label D-I-Y. Show all posts
How to Transform a Table with Fusion Mineral Paint

How to Transform a Table with Fusion Mineral Paint


Furniture makeovers are all over social media! Have you hopped on the band wagon? If you follow me on Instagram and Snapchat, you've seen the photos I've recently shared of my front door and coffee table makeovers.

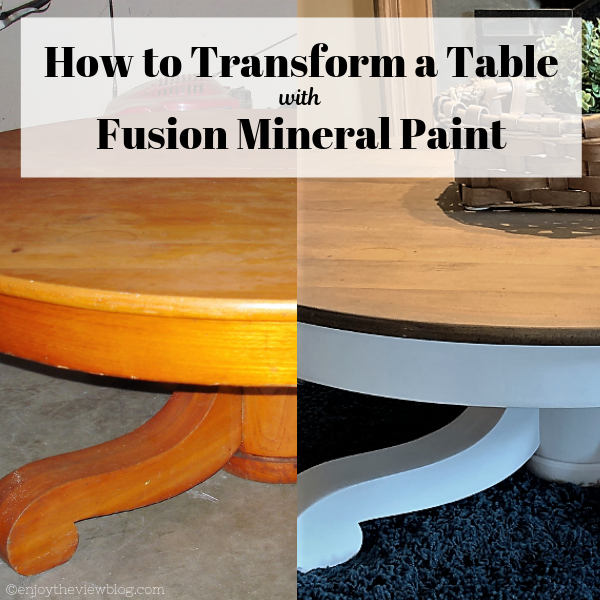
Sometimes, we're unhappy with furniture and all it really needs is a new outfit for us to love it again. Like this coffee table...

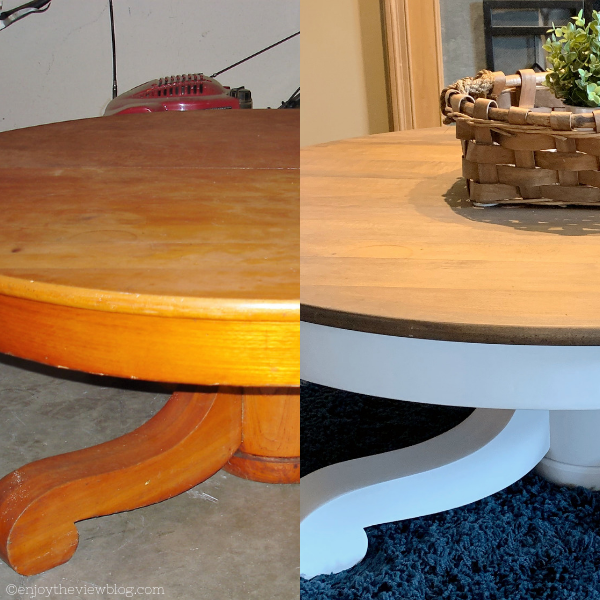
before and after photos of a round coffee table

This coffee table has such a history. It originally belonged to my great-great grandmother, and at that time was a large dining table with two removable leaves. She raised my grandfather, and he would tell stories about how she ironed clothing on the table. She used a cast iron "sad" iron, and would place a metal canning ring on the table so the iron wouldn't be directly on the wood. Of course, being metal, the ring became very hot, and burned a ring on the surface (you can see it in the left lower corner of the photo below).

After her death, the table went to my grandfather. He refinished it several times, but never took off the ring burn (thank goodness!) since it reminded him of his grandmother. By the time he passed the table to my mother, it had been cut down to make a coffee table and the leaves were long lost.

round wood coffee table
how the table looked when I got it from my mother

My mother gave me the table back in the early 1990's, and I kept it in storage for several years. Not because I didn't want to use it, but because of it's size. When we moved to Kentucky in 1997, our living room was large enough to accommodate the table. Gus stripped the table and applied an espresso-colored gel stain (the kind you leave on). It was better than it had been, but I still wasn't happy with it. And Gus wasn't happy with me since he had spent so much time on it.

base and legs of a coffee table stained in espresso
table with "leave-on" espresso stain

Fast forward to early 2019 - when I discovered Fusion Mineral Paint (FMP) and knew that's what I wanted to use on the table. Gus finally agreed to dividing the work - he would sand the table and I would paint and stain it.

I read everything I could find on Fusion Mineral Paint and joined the Paint It Beautiful Facebook group. Once I was sure I knew what needed to be done, we took a trip to our local Fusion retailer, Dresser Up Vintage Boutique in Newport. We purchased:

  • Fusion Mineral Paint in Casement
  • Fusion Mineral Paint (Homestead House) Stain and Finishing Oil in Cappuccino and Natural
  • Fusion™ TSP
  • Cling-On O Series brush (045)
  • Miss Mustard Seed's Milk Paint Hemp Oil Wood Finish

round coffee table with dark stain partially sanded off
removing the espresso stain

Gus took the legs off the table and cleaned all the pieces with Fusion TSP (which is actually an organic TSP alternative that doesn't have to be rinsed off). He used the electric sander (180 grit) to take the stain off, then sanded by hand with 220 grit. For the part of the table that was to be painted, he also sanded with 320 grit. (FYI: Don't sand anything to be stained with a grit higher than 220 or you will "close" the grain and stain won't penetrate or penetrate evenly.)

legs of a table painted with white primer
legs with BIN Zinsser primer

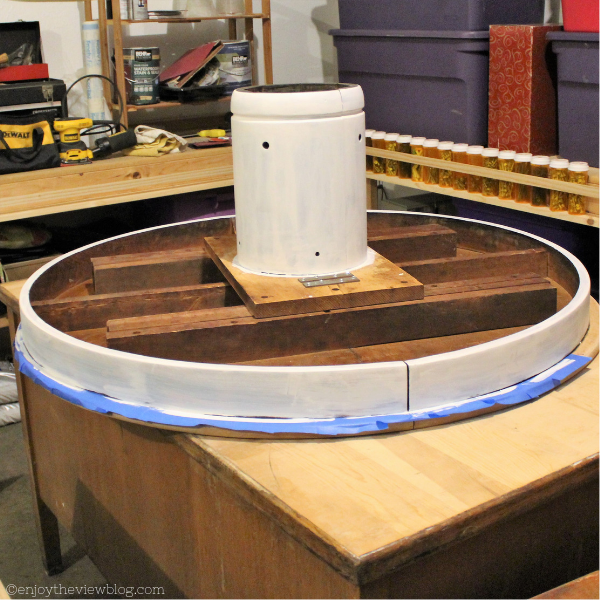
tabletop turned upside down with primer and painter's tape
pedestal and apron with primer

Once it was sanded, he cleaned off the dust and primed everything but the top (since it was going to be stained) with Zinsser oil-based BIN primer. We opted for the oil-based primer since we weren't certain of the type of wood (I was always told it was maple) and we didn't want to risk any tannin bleed-through after all the work Gus put into prepping it. I had also read that the Casement FMP paint didn't have a lot of pigment, creating the need for multiple coats for coverage, so the use of the white primer cut down on the number of coats I needed to apply.

The important things to remember with FMP are:

  • don't use too much paint
  • brush in one direction
  • don't go back over the paint once you've applied it
  • use an excellent-quality brush (like Cling-On or Staalmeister)

If you prep well and follow these guidelines, you will have very few (if any) brush strokes!

legs of table with two coats of white paint
legs with two coats of Fusion Mineral Paint in Casement

Even with priming, it took four coats to get the coverage I wanted - which I understand is common for Casement. I did not sand between coats because I wasn't aware of the process at the time, but I did wet sand with hemp oil and 800 grit sandpaper after the last coat of paint. It gave the table legs such a smooth finish!

I have to apologize for the photos that show the Cappuccino stain. None of them really show the true color. I tried photographing in different light, adjusting the color in Photoshop, and it still always looked too yellow or red. The true color is really more of a neutral brown.

tabletop with cappuccino stain
 applying Natural stain to table top (over the Cappuccino stain)

tabletop stained with cappuccino stain
after one coat Cappuccino stain and two coats Natural stain

For the table top, I used an inexpensive chip brush to apply the Cappuccino stain and soft, clean t-shirt rags to wipe it off. I applied to one half of the table at a time, and started wiping it off as soon as I finished the section. You can leave the stain on for up to 10 minutes, but I didn't want it to get too dark, so I wiped it off quickly. I was happy with the color, so I applied two more coats of stain, but I used the Natural shade so it didn't change the color.

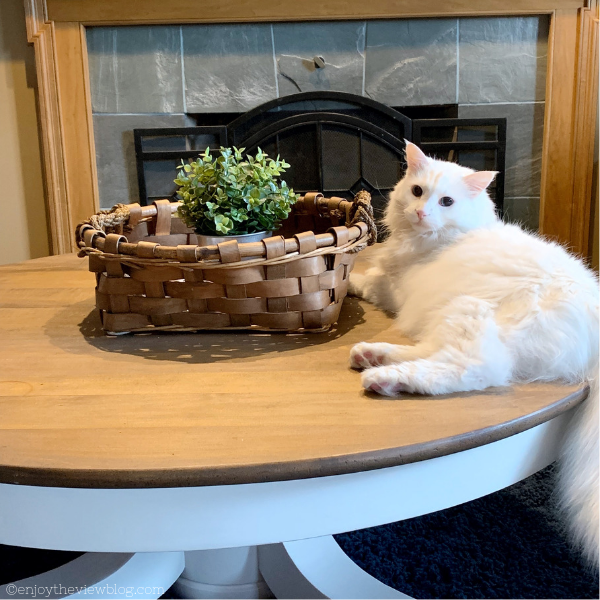
round coffee table with a white cat laying on it in front of a fireplace
Patrique really likes the "new" table

before and after of a round wood coffee table
my great-great-grandmother's table, before and after


round wood coffee table painted white on the bottom and cappuccino-stained top
We love the table now!

We were so pleased with the results that we decided to re-do the buffet portion of Gus' great-aunt's china cabinet in the same colors - and use it as a TV/entertainment cabinet! I'm still working on the drawers for that, but I'll do a post once it's finished!

What's your favorite furniture makeover? Have you used Fusion Mineral Paint?
Read more...
Kim
0 Comments
Skin Benefits of Wearing Chocolate Makeup (with DIY recipes!)

Skin Benefits of Wearing Chocolate Makeup (with DIY recipes!)


Want a guilt-free way to enjoy chocolate? Makeup and skincare products! Cocoa contains antioxidants and can increase circulation. Check out the DIY chocolate skincare recipes!

(This post may contain affiliate links which were added to make it easier for you to find the items. If you click on an affiliate link and make a purchase, I will receive a small commission (at no extra cost to you). You are free to use the links or not - if you do, I thank you!)


Who loves chocolate? *raises both hands* I do, I do!! Just the smell is enough to make my mouth start watering!

There are several chocolate-infused makeup products and skincare products on the market. I absolutely love Too-Faced Cosmetics Chocolate Soleil and Milk Chocolate Soleil Matte Bronzers. And have you seen their new Cocoa Powder Foundation or the Chocolate Bar Eye Palette? Girl, I'm going to have to go eat a piece of Dove Chocolate in a minute!

Gwen Lewis is back today with a post about the skin benefits of wearing chocolate makeup. AND...she has included a few DIY recipes for some chocolate skincare! Stick around and check it out!


Skin Benefits of Wearing Chocolate Makeup

Chocolate fondue for your face is a delicious reality. Except this fondue isn’t a remnant of last night’s dessert. Chocolate-infused makeup and face masks are the new beauty trend, and they are a sweet decadent delight and completely guilt-free!

Cocoa in its pure form is filled with antioxidants and helps increase circulation. While most of us choose to eat our chocolate, facial scrubs, masks and cosmetics featuring cocoa have sweetened our options.

While cocoa offers skin benefits, its scent also lifts us up. Smelling chocolate is like smelling coffee…it makes us feel invigorated and happy. And eating chocolate - bars that contain at least 70 percent cocoa - also can help lower stress, relieve coughs, lower the risk of diabetes and even help with weight loss.

Sweet cocoa has been infused into eye shadows, bronzers and even lipsticks to drench your face in the pure sweet decadence. But, please, don’t start eating your palettes or chomping on your lippies…this chocolate is for beauty only.

However, if you want to mix up a few recipes that you can dip a finger into while also treating your skin, try a few DIY face masks and scrubs that feature cocoa as the main ingredient.

Chocolate Oatmeal Face Mask

Cocoa contains antioxidants and can increase circulation - check out the DIY chocolate oatmeal face mask recipe!

Gourmande in the Kitchen created this simple four-ingredient face mask. Honey, cocoa powder, cream and oatmeal combine for the perfect no-bake face cookie! Kidding, but it does smell like something you’d bake up in the oven. To serve up this mask, mix 1/3 cup of cocoa, ¼ cup of honey, 2 cups of heavy cream (or sour cream…per the site) and 3 tablespoons of oatmeal powder. Apply the mix to your face and let it sit for about 20 minutes. Good luck not tasting the mask before putting it on your face…it’s pretty tempting!

Chocolate Sugar Face Scrub

Cocoa contains antioxidants and can increase circulation - check out the DIY chocolate sugar face scrub recipe!

Sometimes I like to fly by the seat of my beauty pants and mix up random concoctions. This yummy sugar scrub is crafted by mixing three ingredients: coconut oil, sugar and cocoa powder. I don’t really measure my ingredients, but I probably use about a teaspoon of coconut oil, ½ teaspoon of cocoa powder and a tablespoon of sugar. I use this scrub for my T-Zone, so I never mix up a lot. However, if you want a larger scale recipe for gifting or just to have on hand in the bathroom, check out Sarah Miller’s recipe over at Snapguide. She uses almond oil and vanilla in her scrub…which probably adds even more yummy deliciousness to the recipe!

Cocoa Bath Bliss

Ever want to bathe in chocolate? Cocoa contains antioxidants and can increase circulation - check out the DIY chocolate milk bath recipe!

Many spas feature mud baths for skin treatments. Who wants mud, though, when you can bathe in chocolate? Leave it to Food.com to capture melted chocolate bath fantasies! If you’ve dreamed of surrounding yourself in pure chocolate, this recipe is for you! Chocolate Milk Bath features four ingredients: 1 cup of powdered milk, 1/8 cup of cocoa powder, 1 tablespoon of cornstarch and ½ teaspoon of cinnamon. Mix all four ingredients and then add it to a running hot bath. Soak and enjoy as you surround yourself in hot cocoa!

Chocoholics can take joy in the new wave of cocoa-infused beauty products. And, if you don’t feel like splurging on the name-brands, mix up your own chocolate treatments at home. Just don’t eat the masks or drink your bathwater. Although it is still perfectly acceptable to lick the mixing spoon!

Gwen Lewis is a writer who lives in California. She has been in the makeup and fashion industry for years and loves writing on the topic to give tips from experience. In her free time she loves to stay active and has just taken on learning how to surf.

Don't forget to check out Gwen's other posts: Enhance Your Beauty With Yoga, Tips That Help Your Makeup Last Longer, The Complete Guide to Spring Cleaning Your Beauty Products, Beauty Threats: Why Sharing Makeup is More Dangerous Than You Think!, Beauty and Nutrition Tips for Spring, and Pampering on Purpose: Why treating yourself is healthy, not frivolous!.


Read more...
Kim
0 Comments
Adorable Snowbaby Snowman Tutorial!

Adorable Snowbaby Snowman Tutorial!


I love snowmen!! I've amassed quite a collection over the years because I can't resist a cute one when I see it! My Sock Snowman tutorial from a few years ago is one of my most popular posts. It gets pinned on a daily basis, and I still get questions and comments on it! Since it's such a fan-favorite, I was thinking about how I could put a new twist on it, and I came up with SNOWBABIES!

snowbabies made from holiday baby socks

(This post may contain affiliate links which were added to make it easier for you to find the items. If you click on an affiliate link and make a purchase, I will receive a small commission (at no extra cost to you). You are free to use the links or not - if you do, I thank you!)

They're made with the same basic steps, but instead of using adult-sized socks, I used baby socks! The finished product is about 4-5"tall, depending on how much rice you put inside and how tall you make the hat.

sock snowbabies standing next to a 6" ruler

Here's how to make your own snowbabies!

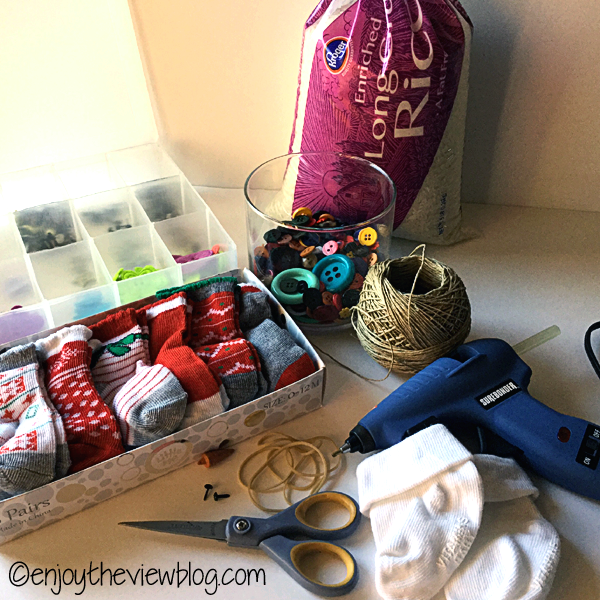
baby socks, glue gun, twine, buttons, rice, scissors, rubber bands

Supplies I used for each snowbaby:

For clarification, these are the mini scrapbooking brads that I use for eyes on all of my snowmen - the babies and the regular size. I think I bought mine at either Michael's or Hobby Lobby. As you can see, they're about 1/4" in length, and the head is about 1/8" in diameter. I've linked to some on Amazon.

tiny brads lying next to a ruler to show size

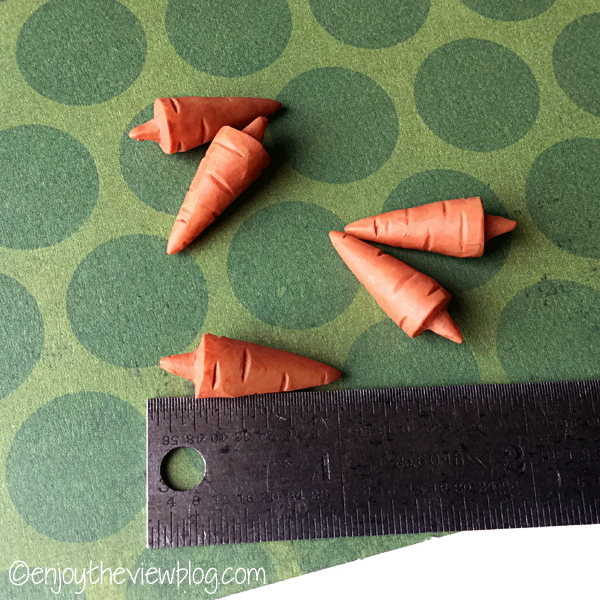
And these are the 7/8" snowman carrot noses that I purchased from consumercrafts.com. I use these noses on both the snowbabies and the regular-size snowmen. They are also available on Amazon. I recommend checking both places and figuring in your shipping costs and the number of noses you need. If ConsumerCrafts is having a shipping special, it will probably be less expensive to purchase from them. If you have Amazon Prime and think you'll need a good number of noses, it might be cheaper to buy from Amazon.

tiny carrot noses lying next to a ruler to show size

Now on to the tutorial!

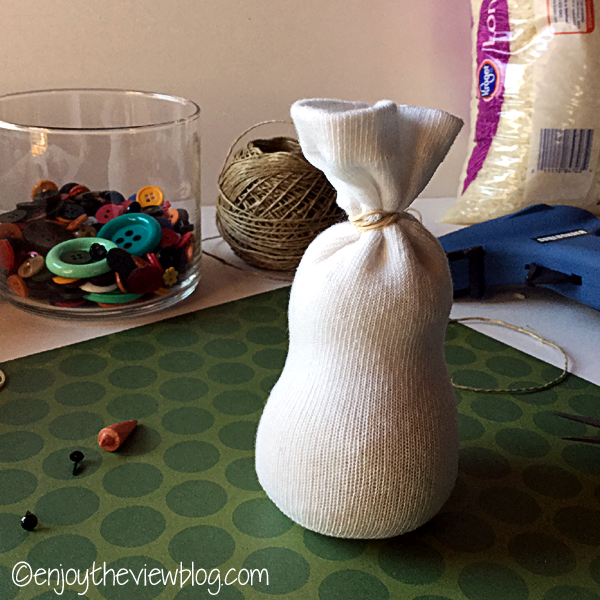
First, fill the white sock with 1 cup of uncooked rice. You may find that using a funnel is easier since the sock is so tiny. The socks I bought had cuffs, so I was able to get a little extra height from them, making my snowbaby body about 4" tall. Hold the sock closed and shake the rice down so that you can get a nice even edge at the top - then use the rubberband to tie off the top of the sock.

If you have used my other tutorial, you will notice one difference here. With the larger socks, you cut off the "leg" of the sock, turn it inside out, close one end with a rubber band, then turn it right side out and begin filling with rice. With the baby socks, the socks are so tiny, I just used the entire sock as the body of the snowbaby.

white baby sock filled with rice

Depending on the amount of selvage you have left at the top, you may be able to just use the hot glue gun to secure those edges against the top of the sock. I felt like I had too much fabric, which made it bulky. So I trimmed some of the sock away at the top edge, just leaving about 1" of sock above the rubberband. Then I smoothed this out over the top of the snowbaby's head and used the glue gun to glue it down flat.

white baby sock filled with rice, tied off with rubberband, and glued down

You're going to use the patterned sock(s) to make the sweater and hat for the snowbaby. The sock pictured below has stripes, which are like little cutting lines. The first cut is going to be from the top of the heel, straight across - this upper part of the sock will create the sweater. The second cut will be from the bottom of the heel straight across - this bottom part will create a small hat.

baby socks cut for making snowbabies

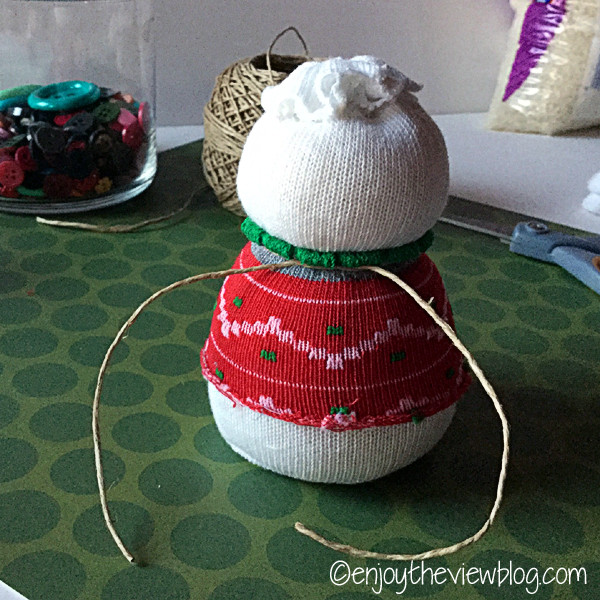
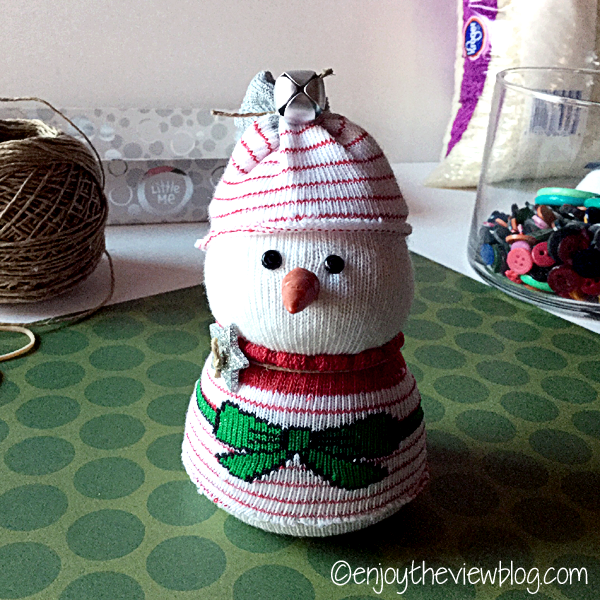
You need to give your snowbaby's body some shape, so stretch that sweater sock (Yes, this is a different sock!) between your two hands, and place it over the snowbaby's body, positioning the band about where you want the neck of your snowbaby to be - then take a piece of ribbon or twine and tie it around the neck and sweater, pulling it tight enough to give the illusion of a neck.

part of a holiday baby sock used to "dress" a sock snowbaby

If you choose to make the smaller hat, you will take the toe portion of the sock that you just cut off and tie a pie of ribbon or twine around the toe, about 1" from the end. You can add a button, flower, or jingle bell if you like.

snowbaby hat made from holiday baby sock

As you can see in the picture below, this smaller hat is cute, but it just seems to be lacking something. I don't know if it's because the sock has so much white in it or if it's just because I feel like I want it to have more. But I decided to use the second patterned sock to make a bigger hat...

snowbaby "dressed" using a holiday baby sock

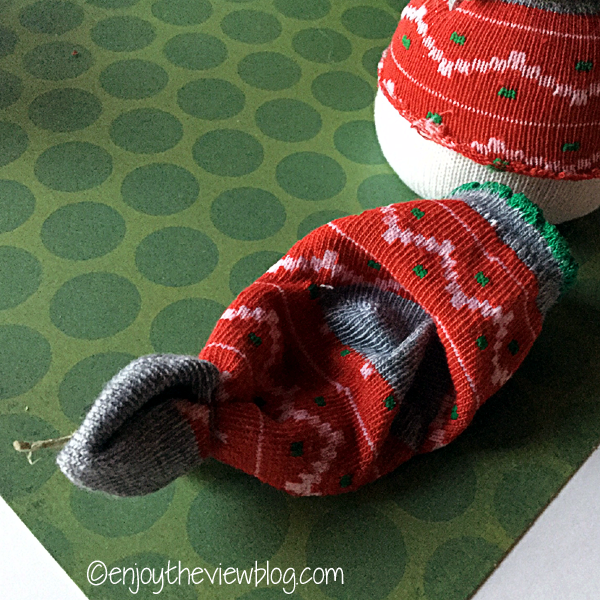
If you opt to make the larger hat, you'll take the second patterned sock and tie off the toe with a ribbon or twine just as I described above. (Yes, this is that different sock again!) Then add your embellishment. Notice the grey area in the center of the sock in the picture below? That's the heel. Just push it back in toward the center of the sock, and turn that side of the sock down...

snowbaby hat made from holiday baby sock

And the front of the hat will look like this...

snowbaby hat made from holiday baby sock

Then you're ready to pop the hat on! I like to position mine a little sideways, but you can place it however you like. Then work with the sock/hat until you get the hat positioned the way you want it.

closeup of snowbaby wearing a hat

Next, you'll need to position your eyes. Just push the brads through the white sock, being careful not to snag the fabric in case you need to reposition. When you have them where you want them, you can add a dot of hot glue to the back and hold into place until the glue cools.

The nose can be just a little trickier if you have a tightly woven sock. There is that little "knob" on the back of the carrot that needs to go inside the snowbaby's head. If the sock fabric is too dense, you can use a toothpick or other small object to make a small opening, then insert the knob through that with a dot of glue on the back.

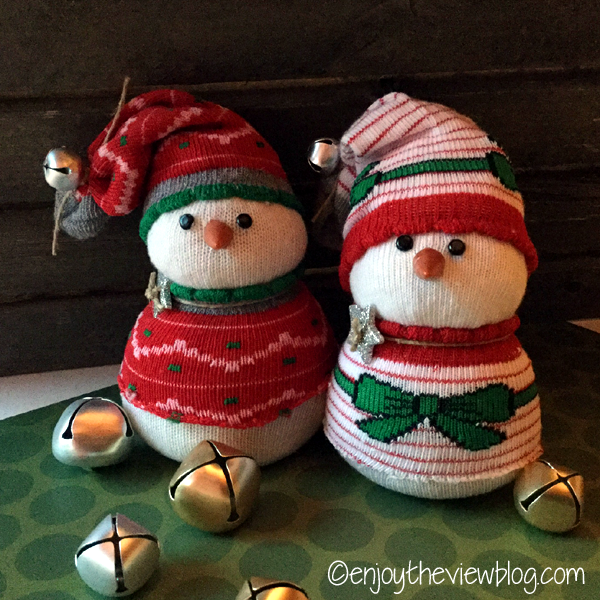
sock snowbabies

How cute are these?? I'm expecting my first great-niece and nephew early in 2016, so I made these guys for them. Their moms and grandma have the larger versions, and in the pictures below, you can see a comparison of the sizes:

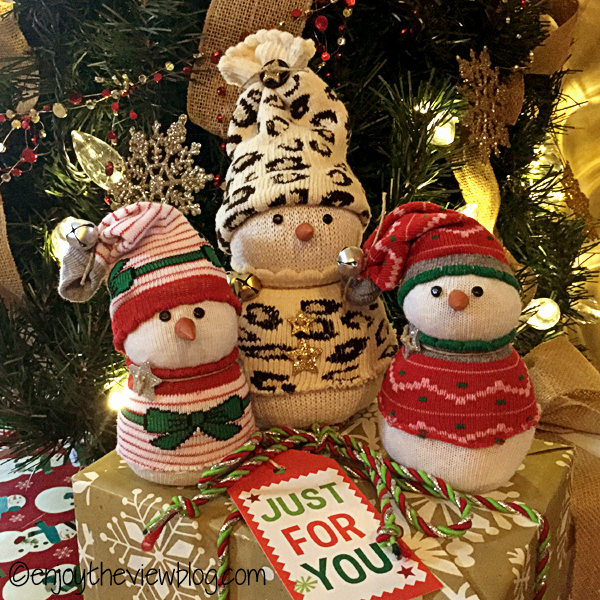
sock snowmen sitting under a Christmas tree

sock snowbabies sitting on a gift box under the Christmas tree

The cheetah-print snowman (which was a request from my niece) is one of the smaller regular-size guys, but you can see that she is a few inches taller than the babies. Also, you'll notice that on the babies, I opted not to put any buttons on the front. The one has a bow on her sweater, so I felt like she didn't need anything else. And then the more I thought about it, the more I decided to leave them without. I do have to make a trip to Jo-Ann's, so if I see some tiny buttons that would work, I might add them, but for now, I think I like them this way.

I hope you enjoyed this snowbaby tutorial, and that you have a blessed holiday season!!


Read more...
Kim
0 Comments
Book Review: Washi Tape Crafts: 110 Ways to Decorate Just About Anything

Book Review: Washi Tape Crafts: 110 Ways to Decorate Just About Anything


If you're like me, you own some washi tape.

Oh, all right. If you're really like me you own a lot of washi tape. And if you're married, your spouse has probably said to you: "Wow, that's a lot of tape" or "There is no way you are ever going to use all of that". Maybe you've heard, "Do you really need all of that" or <Sigh> "You and your washi tape"...

Those are all pretty funny, because we know there is no such thing as too much washi tape, and yes, we do need all of it! (Yes, Gus has said all of the above to me!)

So you can understand why I was so excited to receive a copy of Amy Anderson's latest book: Washi Tape Crafts: 110 Ways to Decorate Just About Anything !

Washi Tape Crafts: 110 Ways to Decorate Just About Anything - this book is fabulous for everyone, from the beginner to the washi tape expert! Not only does it have project ideas for every skill level, but it even comes with 10 rolls of washi tape!

Not only is this a fabulous book with projects for the entire family, but it also comes with ten rolls (18 feet each) of custom-designed washi tape!! Look at those colors and designs - and, yes - those are sprinkles on the pink tape (4th from the left)!!

I love the coordinating designs of the washi tape that is included with this book!

And the projects! Trust me, I have had way more than one "why didn't I think of that?" moment while looking through this book! I don't want to give away too many of the awesome projects, but how cute are these gift tags? I've made washi tape gift tags before, but mine weren't this cute!

These gift tags are so easy to make, but they give gifts such a personalized touch! Even the kids could make these!

If you live in a rental apartment or home, there is a section on home decor that includes some great ideas for personalizing your space without making permanent changes. If you love washi tape, fun DIY projects, or are looking for something new to do - you should give this book a look! And remember, the holidays are just a few weeks away - Washi Tape Crafts is a perfect gift!

If you're looking for gift ideas, this book is perfect! A book and craft kit all-in-one!!

Who doesn't love working with washi tape? I love that it's repositionable, so no mistake is permanent!

More about Amy Anderson:
Amy Anderson is the creator of washitapecrafts.com, modpodgerocksblog.com, and the author of Mod Podge Rocks! She write and crafts from Atlanta, Georgia, with her dogs, Roxie and Yoshi.

(Disclaimer: I received a complimentary copy of this book for review, and there are affiliate links in this post - however, all opinions are honest and 100% mine.)

~  ~  ~  ~  ~


Are you blog-stalking me yet? If not, you should be! You can find me on

Facebook - enjoytheviewblog.com Pinterest - enjoytheviewblog.com Twitter - enjoytheviewblog.com Google - enjoytheviewblog.com Instagram - enjoytheviewblog.com Bloglovin - enjoytheviewblog.com LinkedIn - enjoytheviewblog.com
Polyvore - enjoytheviewblog.com
Read more...
Kim
0 Comments